COURSE TOUR
-
Hole #1
The 1st hole is one of the hardest holes on the course. It plays longer than the yardage indicates because it is slightly uphill. The drive should favor the right side of the fairway to give the player the easiest angle to the hole. The green is closely guarded by four bunkers and the false front keeps miss-hit balls from running onto the green. The green is relatively flat by Metuchen standards but is quick to burn you if you are careless. Take your par and move on to the next hole.

-
Hole #2
The 2nd hole would be right at home on any great golf course. At 178 yards, the hole is of average length but it plays uphill to a turtle back green. Center of the green will yield a decent chance at birdie for all hole locations. Stray from the tee, especially to the right and you can make any number. A three is a great score here.

-
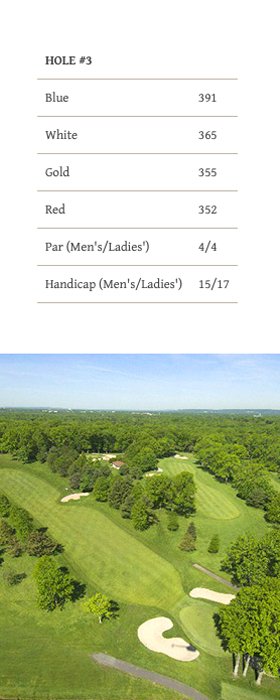
Hole #3
The 3rd hole is a relatively short par 4, slightly down hill with the landing area guarded by a pond on the right and a bunker on the left. The longer hitter can challenge the bunker and leave short iron to the green. The short hitter must decide if a driver is the right club to hit the fairway which is sloped hard from left to right. The green is guarded by a classic Redan-style bunker, angled with the green and in the front left. The green complex is generally in the shade, has many devilish breaks and provides several very challenging hole locations. A birdie is possible here, but a par on this hole is a good score.
-
Hole #4
The 4th hole plays significantly longer than the yardage on the card. With an uphill tee shot to a fairway sloped gently from left to right, accuracy is once again at a premium. The drive needs to favor the left side of the fairway to insure you won't have to deal with the overhanging branches on the right. Once you get to your tee shot, you are faced with a long, narrow green guarded by bunkers in front, on the left and on the right. Any shot missed to the left will most likely result in a bogey as the green runs from left to right. The green has two distinct sections in the front and back that provide challenging hole locations for all players.

-
Hole #5
This tight slight dogleg left begins with a tee shot to a narrow fairway barely 20 yards wide in the landing area. A shot of 200 yards will leave you short of the bunkers on the right and a reasonable approach to the green. Guarded by a creek in the front and bunkers all around, this long and narrow green is tough to hit and tougher to read. Don't be fooled by the length of this hole, par is a good score.

-
Hole #6
The 6th hole is a legitimate birdie hole but don't take it for granted. The landing area is wide but stray to the right and the pond guarding the dogleg will catch your drive. A 250 yard drive up the fairway will leave you a challenging uphill shot to a narrow green with a pond on the left and bunkers on the right. Long hitters can give it a shot but a good lay-up will leave you with 100 yards. The pond to the left of the green is only 6 feet off the putting surface and catches many stray shots. The green is typical here at Metuchen, with a severe back to front slope and many difficult hole locations. You can be aggressive here on this shortish risk-reward par 5.

-
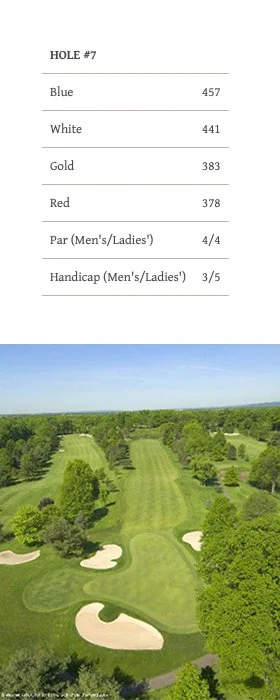
Hole #7
The demanding par 4 7th requires a good tee shot to set up any shot of hitting the green in two. Even though it plays slightly downhill and straight away, you must hit the fairway to give yourself a shot of 180 to 200 yards into the green. The narrow, undulating green is guarded by bunkers left and right and shares the putting surface with hole #12. You may find yourself frequently chipping to the green on this hole where par is an excellent score.
-
Hole #8
The 8th hole at Metuchen is a slightly uphill, dogleg left that plays considerably longer than its yardage. Drives hit between 220 and 240 land into the upslope and leave a tough shot in to a small green. The uneven lies in the fairway make the second shot even more challenging. The green is guarded on both sides by bunkers and a newly added false front will reject any shot landing short on the green. The green slopes hard from right to left making all hole locations on the right extremely difficult. Par is a great score on this hole.

-
Hole #9
The 9th hole is a tight drive to a tree lined fairway. The hole plays longer if your ball flies less than 200 yards because the fairway is sloped towards you. Tee shots in the 210 to 240 yard range leave you with a flat lie to a small undulating green protected by bunkers on both sides and an overhanging tree on the left. The newly added false front provides a challenge to anyone coming up short. You may have a birdie opportunity here but the severe green protects against many long putts being made for birdie.

-
Hole #10
This is a classic risk-reward hole for the average golfer. If you happen to be long enough, the 10th hole will tempt you into playing aggressively and driving the green. You must be accurate however, with out of bounds close on the right and bunkers on each side of the fairway and green. A 180 yard shot off the tee will leave you with 80 to 90 yards depending on the hole location, a great distance to attack the flag from. Once again you must be accurate, the green slopes hard from left to right and is often one of the fastest on the course. The green is guarded by a shallow bunker on the left and two deep bunkers in front to catch poorly struck approaches. A birdie can be had on this hole but many bogies are made.

-
Hole #11
The 11th hole is a demanding par 5 that even the longest players have tough time reaching in two shots. The tight chute of trees off the tee dictates a fade to hit the fairway. A bunker guards the left side of the landing area. The second shot requires 180 to 200 yards to the left side of the fairway. This will help you avoid the bunkers protecting the corner of the fairway and having to deal with the overhanging limbs. The third shot will be to an open green that is the flattest on the course. The green is surrounded by bunkers but you usually don't have to play over any of them. The real challenge to the hole is getting to the green. Be accurate and par is a good score here.

-
Hole #12
The 12th hole is our second good birdie opportunity on the back 9. The longest players may try and drive the green but penalties can be found in long bunker shots, out of bounds to the right and a pine tree guarding the green to the left. A shot of 180 to 200 yards will leave a blind approach if you are not on the left side of the fairway. The double green with hole #7 is sloped front to back and requires a high shot to hold. Be accurate or you may find bunkers on the left, right or long catching your wayward shots.

-
Hole #13
The 13th hole starts out with a relatively open tee shot to a blind fairway. It is best to favor the left side as the double dogleg to the right is easier to play attack from the left. Bunkers guard both sides of the fairway and help frame the tee shot. The second shot will be played over the corner of the dogleg to a fairway that slopes away from you and to the left. From here the challenge is avoiding the greenside bunker on the left and keeping the ball on the proper level of the green. The green is sloped back to front with a ridge separating the front and back sections of the green. Par here is a good score.

-
Hole #14
The 14th hole is the signature hole at Metuchen Golf and Country Club. The wide fairway with out of bounds up the right side is virtually split into two sections by our famous Metuchen tree in the middle of the fairway. You must choose which side to play down, but the left is preferred if you are not feeling confident off the tee. Once on the fairway, you must decide if you have room to play a shot under the overhanging branches and over the pond guarding the front right side of the green. If you have shot over 200 yards, a successful lay-up will leave you between 80 and 100 and allow you to attack the pin. With bunkers right and left and trees long, this green looks fairly small even though it is one of Metuchen's largest. Once you are on the putting green, you have a very difficult putting surface with many great hole locations. Par is a great score here.

-
Hole #15
The short par 4 15th may look easy on the card but many golf tournaments have been lost here. The fairway is already tight at about 180 yards off the tee and then is split in two by a fairway bunker in the center of the fairway. With out of bounds on the right and trees on the left, you are wise to make sure you are in the fairway. A shot of 175 yards will leave you in the 125-130 to a green split down the middle by a significant spine. If you can position your ball on the opposite side of the fairway to the flag, you will have a much easier time getting your approach shot closer to the hole. The green is closely guarded by bunkers both left and right and on the back right. The putting surface is small and severely undulated, once again putting a premium on accuracy. Birdies can be made here but stray off the tee or miss-hit your approach and par will be a very good score.

-
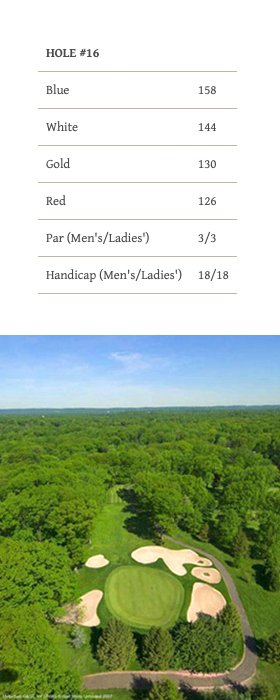
Hole #16
The uphill short par 3 16th hole is the second hole in a row at the club with a spine in the middle of the green separating it into two sections. The green is surrounded by five bunkers and the hole plays somewhat blind as it is uphill from the tee to the green. With a left hole location, the overhanging limbs on the left come in to play and any shot missed left of the green will require a magician's touch to have a chance at par. The green is sloped fairly significantly from left to right and once again puts a premium on the approach shot. Hit the tee shot on the same level as the flag and you should have a good chance for a birdie.
-
Hole #17
The 17th hole challenges you immediately off the tee as the natural chute of trees dictates the need for a very straight drive. Although the hole plays slightly down hill, the bunker guarding the left side pinches the fairway in at 240 yards and the right side is guarded by out of bounds and over-hanging limbs. Once you have negotiated the tee shot, you must get your ball on the right side of the hole as the 17th green is the most severe green on the course. Guarded by bunkers on both the left and right side, you may choose to run the ball onto the green as the shot plays significantly downhill. Two putts on this green and you will walk away a happy golfer. Par is a great score here.

-
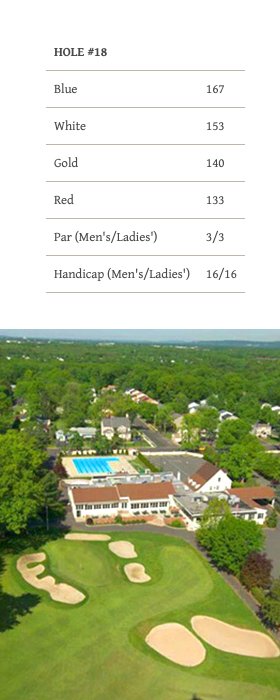
Hole #18
The short par 3 18th is anything but an easy par. The green is no more than 25 feet wide and slopes gently away from the player. Surrounded by bunkers on the right, left, and long, the shot required must be straight and true. Any miss to the left of the green you will need both great luck and a great touch to have a chance to save par. The bunker 20 yards short of the green catches many miss-hit shots and is a challenge to your eye off the tee. The putting green is small but not quite as severe as most greens at the club. If you hit it on the green, you definitely have a chance at birdie.